How does React work under the hood ? The Overview of React internals
You want to know more about React internals so you can write better React code, but it is tough and you don’t know where to start, like you want to dive in but the water is too vast and too deep.
I had the exact same struggle back in 2021 but managed to create a series - React Internals Deep Dive which includes 30+ episodes explaining how React works under the hood.
In this very first episode, I’m going to give you a rough overview of React internals and also some tips on how to learn React internals.
1. Tips on learning React internals
1.1 Grok official materials
React.dev is an awesome place to not only learn React APIs, but also learn the thoughts from React core team. They have put a lot of effort explaining why they made their choices.
React Working Group is a place where people discuss about some cool new ideas.
1.2 Follow React team
Follow all the listed members to keep updated with what React team is doing, their discussions on the internet give us unique perspectives that couldn’t be found in the code.
1.3 Follow React repo
React repo@github is the place where we can see not only code but also those PRs and code reviews. Most of the time they contain better explanations than comments in the code.
1.4 Trust the code, not the posts
I see so many articles about React internals on the internet, but few of them are helpful. Most of them are just explaining some general ideas with no touch on the code, which make them less valuable because after reading them you are still not able to solve the React Quizzes.
Try to navigate through the React source code if you have time, it definitely helps.
1.5 Find the critical path
But the problem is that React code base is humongous and intimidating. My advice and what I actually did is to find the critical path - we don’t need to understand everything at the same time, it is OK to have a rough idea of how something works, and then try to solve the puzzles one by one, forming a network of understandings along the way.
That’s why I’m actually only available to complete this very first episode of overview 2 years after I made the debugging video, because I spent the whole time solving smaller puzzles and it is only now that I feel comfortable explaining the big picture.
2. How I debug the overview of React internals with breakpoints
2.1 Set up breakpoints
Here is the code I’ll use to demonstrate the debugging process.
This debugger tells me when the component is run
useEffect(() => {debugger;This debugger tells me when effect hooks are run
setCount((count) => count + 1);}, []);return <button>{count}</button>;}ReactDOM.createRoot(document.getElementById("container")).render(<App />);
This debugger tells me when the component is run
useEffect(() => {debugger;This debugger tells me when effect hooks are run
setCount((count) => count + 1);}, []);return <button>{count}</button>;}ReactDOM.createRoot(document.getElementById("container")).render(<App />);
Since React is a UI library, one important task is to find the code where DOM is manipulated and then we can read the call stack to figure out what is happening. Here I can just create a DOM breakpoint on the DOM container, like below.

Now it is time to debug.
2.2 First pause at rendering the component
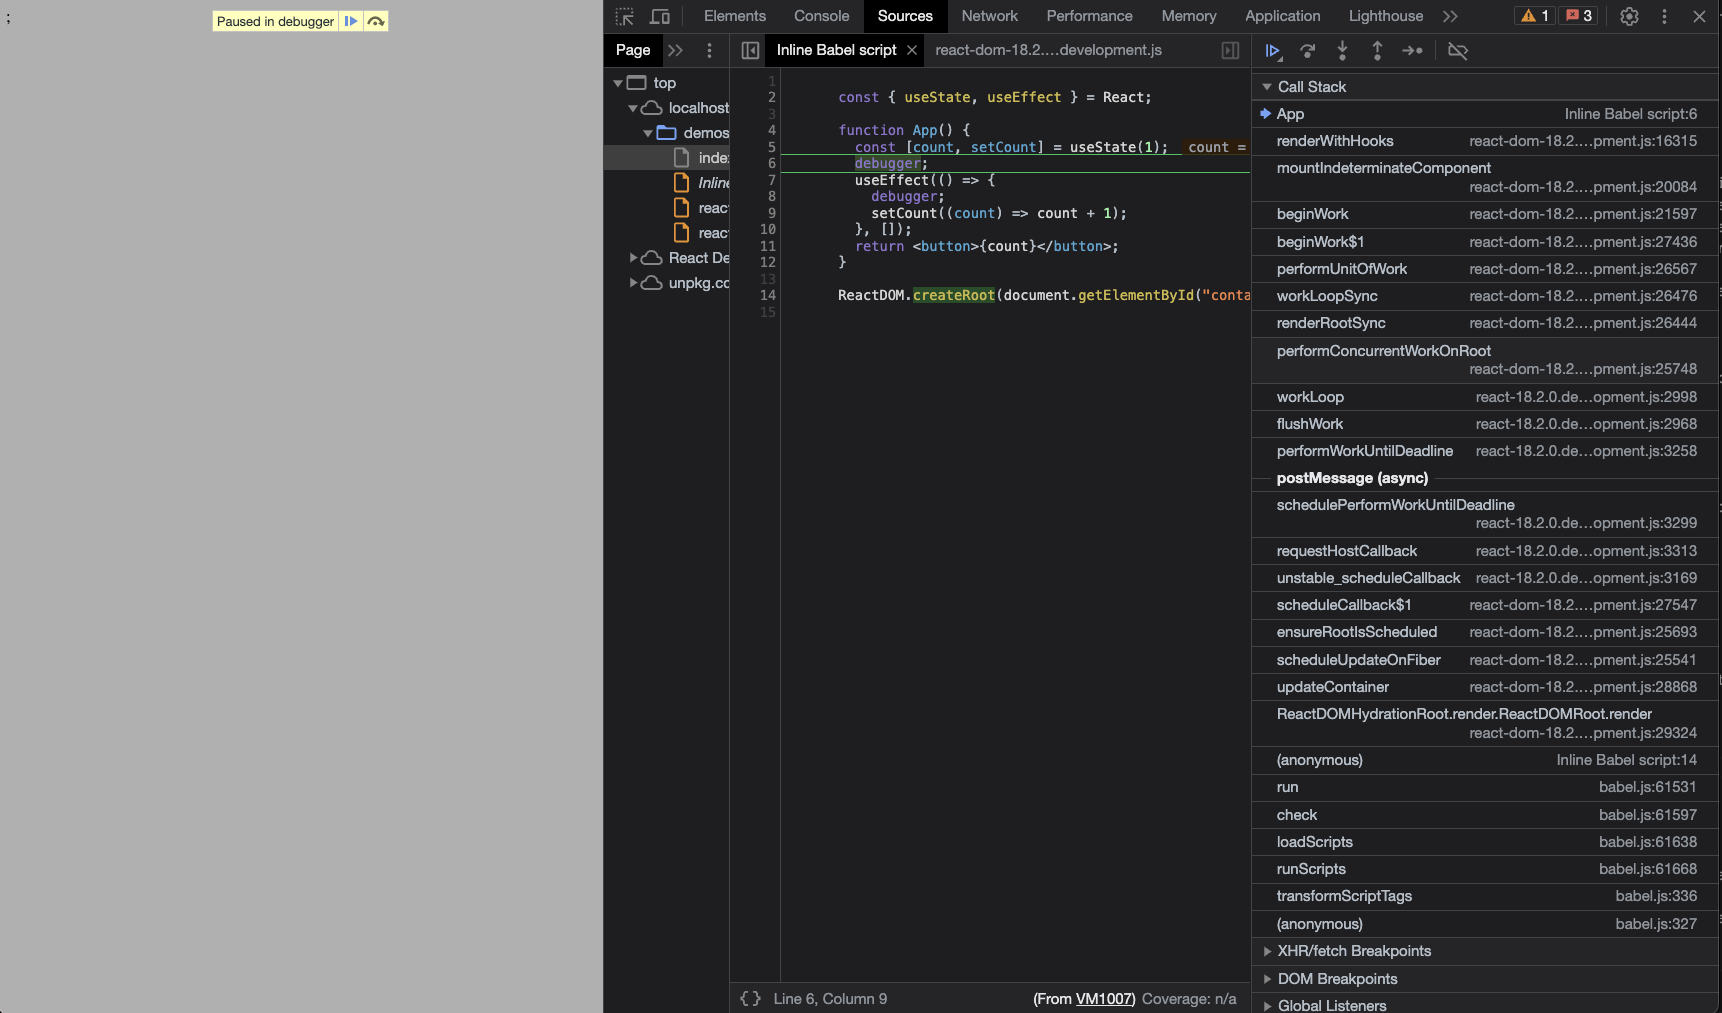
Below are some important functions from call stack.
ReactDOMRoot.render()→ this is the user-side code we write, we firstcreateRoot()and thenrender()scheduleUpdateOnFiber()→ this tells React where to render, for initial mount there is no previous version so it is called on root.ensureRootIsScheduled()→ this important call is to “ensure”performConcurrentWorkOnRoot()is scheduled.scheduleCallback()→ the actual scheduling, which is part of React Scheduler, see from screenshot that it is async bypostMessage().workLoop()→ how React Scheduler processes the tasks.performConcurrentWorkOnRoot()→ the scheduled task is now being run, in which our component is actually rendered.
This gives us some clues on how React actually does the rendering.
2.3 Second pause at DOM manipulation
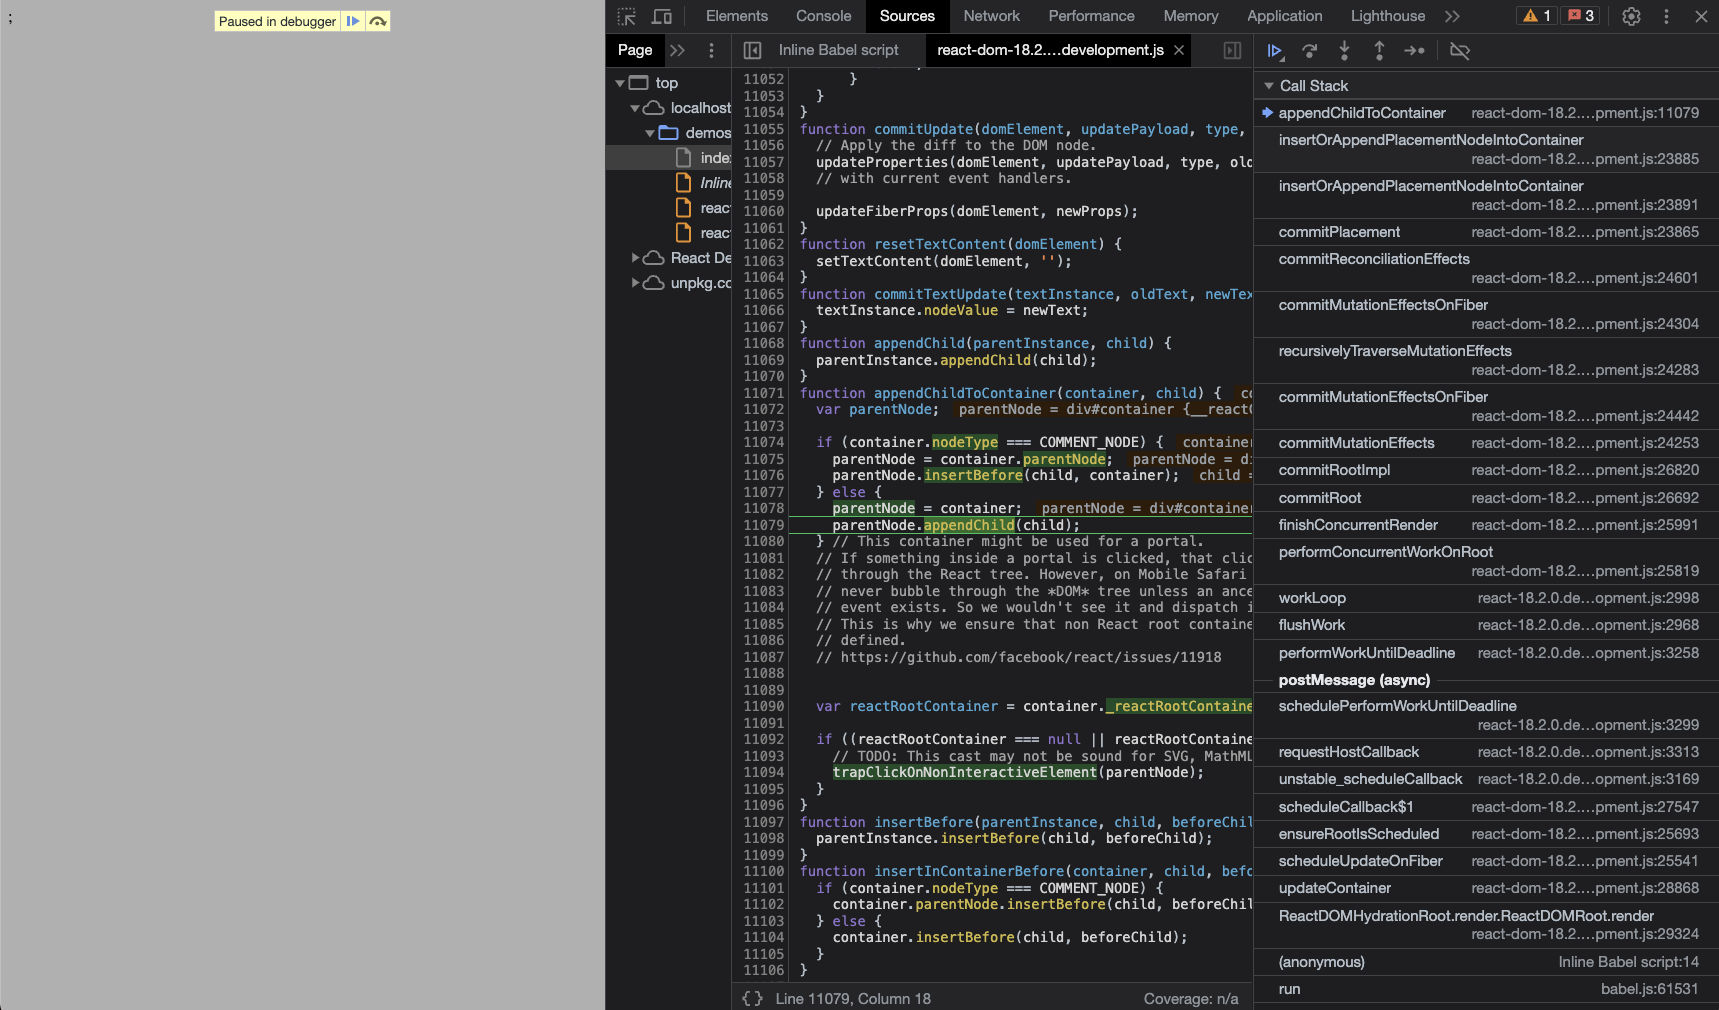
As a UI library, the goal is to manage the DOM updates. This is actually in the “commit” phase after above “render” phase.
commitRoot()→ this commits the necessary DOM updates, derived from previous render phase, it of course does more things like handling effects.commitMutationEffects()→ this is actual update of host DOM.
2.4 Third pause at execution of effects
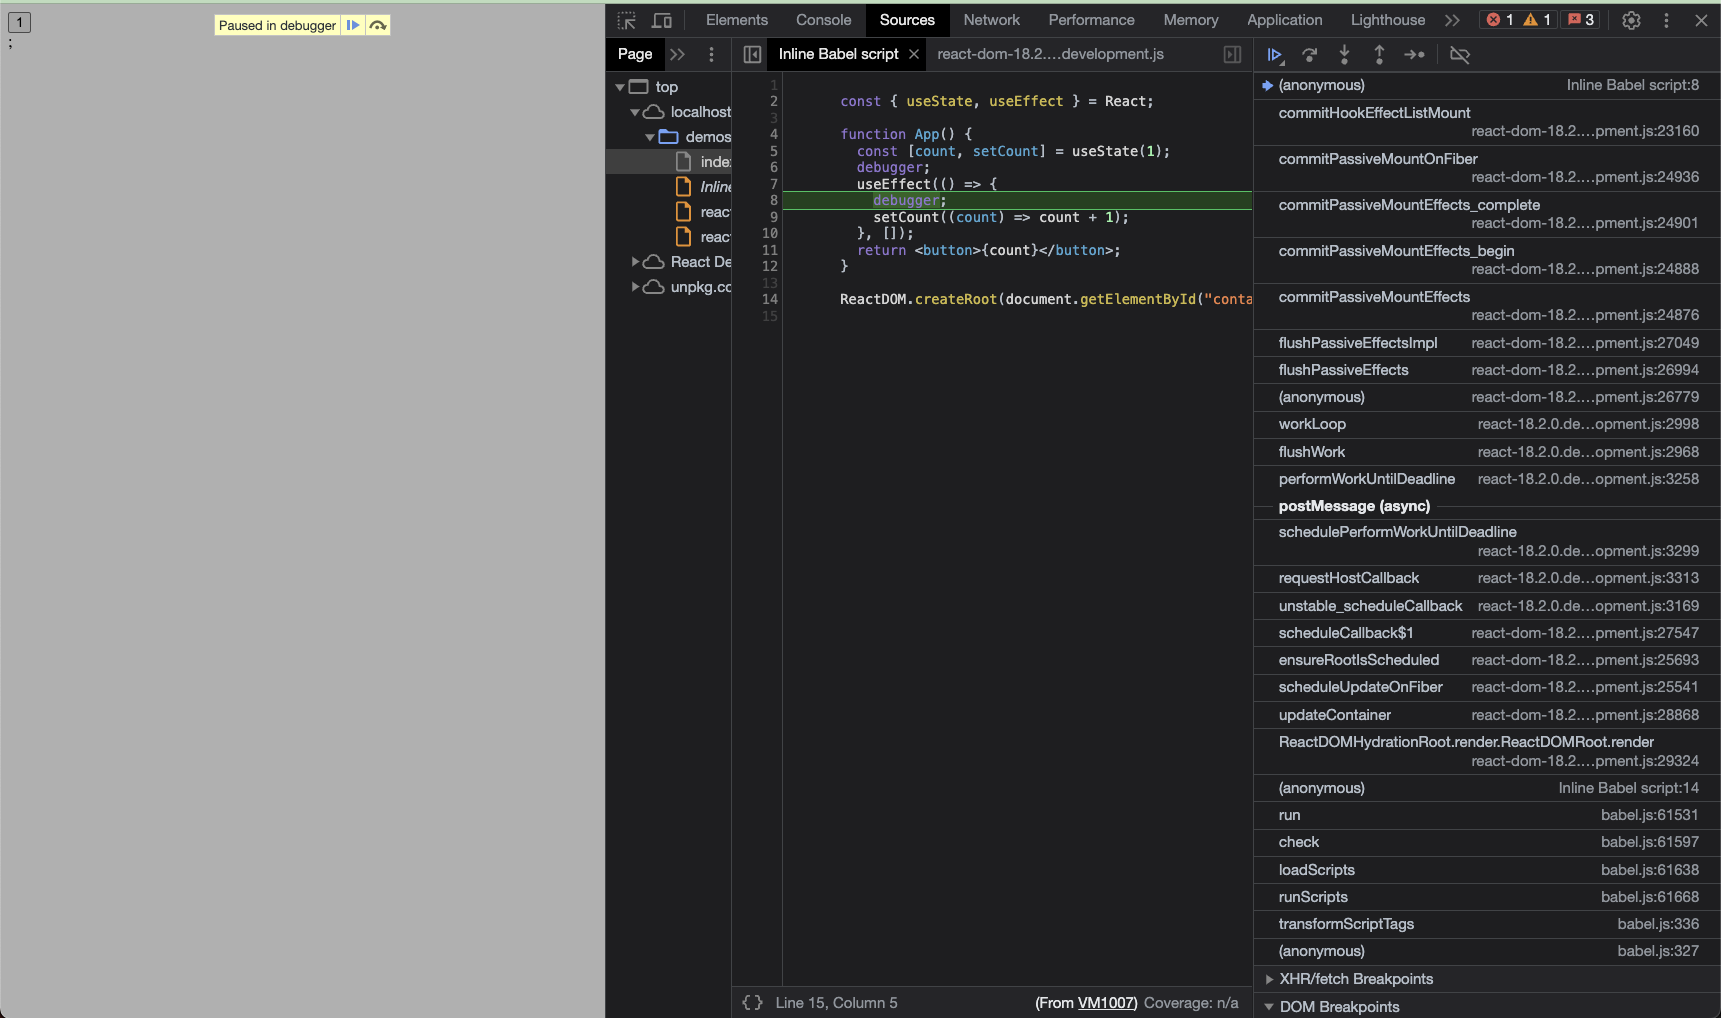
Now we can see it pauses at our useEffect() call.
flushPassiveEffects()→ this flushes all the passive effects, created byuseEffect().
Notice that it is also async by postMessage(), meaning it is not run immediately but scheduled.
If we add a breakpoint in flushPassiveEffects(), we can easily know that it is inside commitRoot().
2.5 Pause again at rendering component
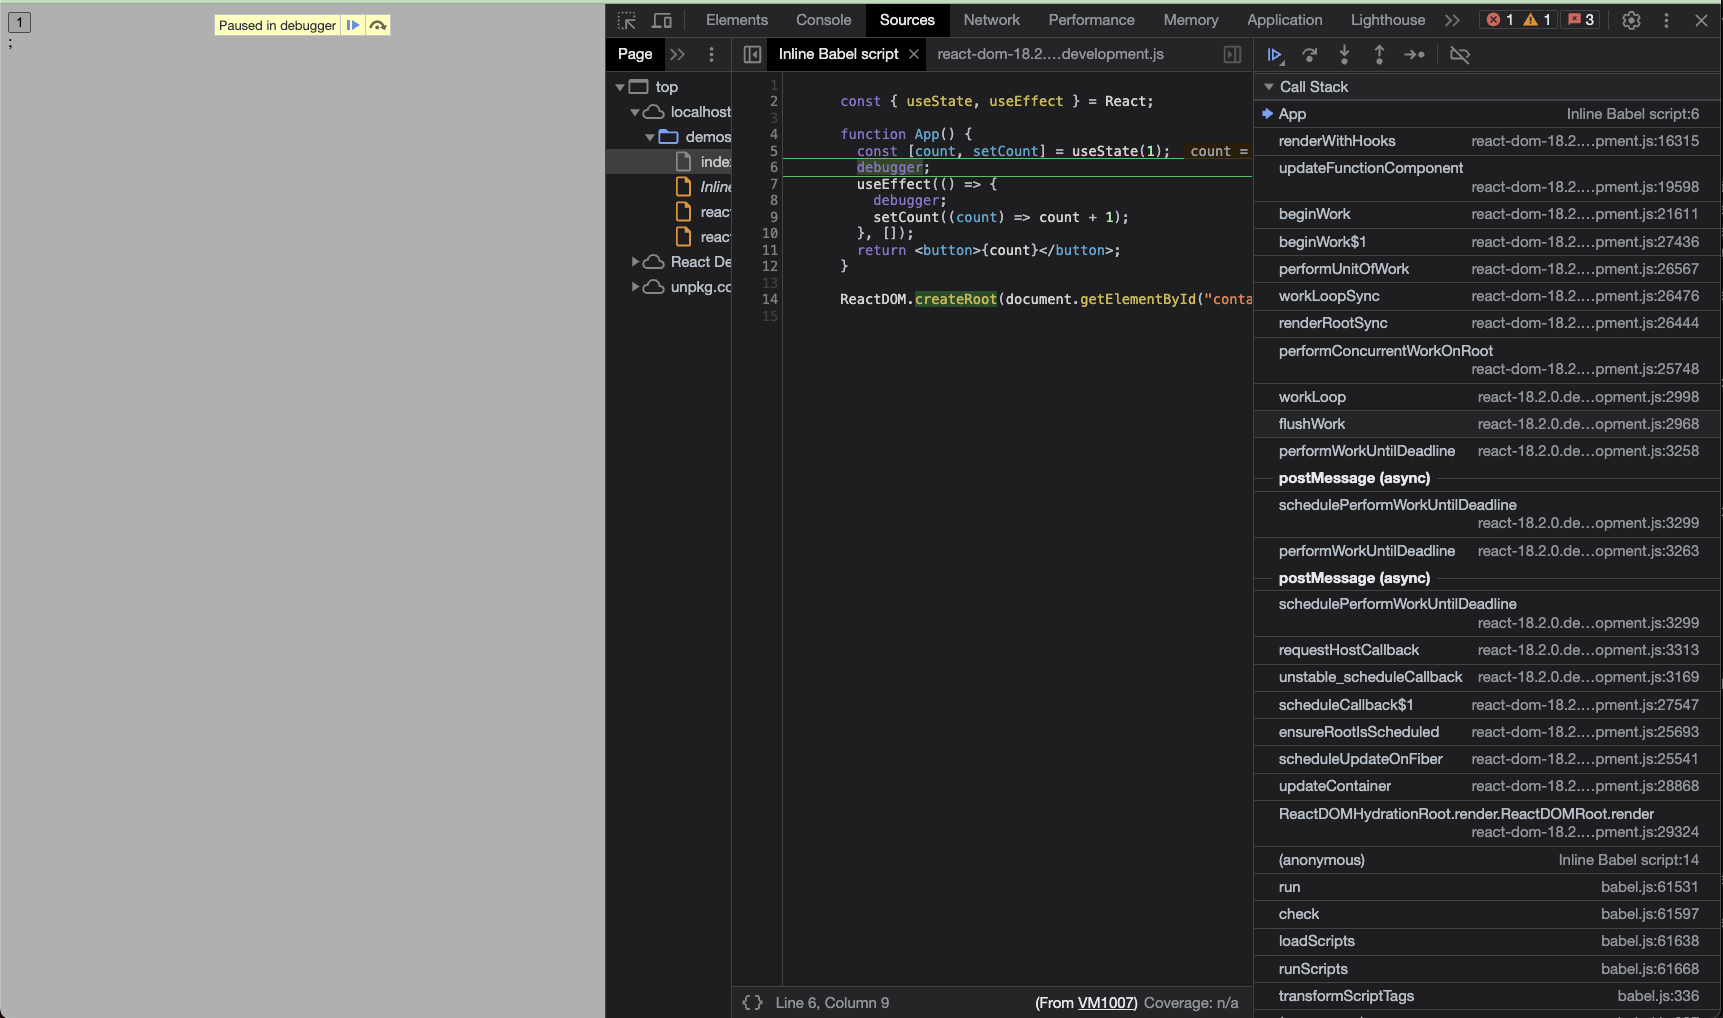
In our useEffect() we call setState() to trigger re-render, from the call stack we can see
that the whole re-render is quite similar to the first breakpoint pause we got,
except that inside performConcurrentWorkOnRoot(), it is
updateFunctionComponent() rather than mountIndeterminateComponent().
In React source code, mount means the initial render, since in initial render there is no previous version to diff against.
3. The overview of React internals
Actually above screenshots already cover the basics of React internals. As an overview, we won’t dive into too much details, but since I’ve already figured out the details, I’ll draw an overview of React internals as below into 4 phases.

3.1 Trigger
I gave it the name “Trigger” since all work is kicked off here. No matter it is initial mount
or re-render caused by state hook. In this phase we are telling React runtime which part of
the app needs to be rendered(scheduleUpdateOnFiber()) and how it should be done.
We can think of this phase as “create a task”, ensureRootIsScheduled() is the last step of creating
such task and then task is sent to Scheduler by scheduleCallback().
For related topics, you can refer to:
3.2 Schedule
This is the React Scheduler, it is basically a Priority Queue
that processes the tasks by priority.
scheduleCallback() is called in runtime code to schedule tasks like rendering or running effects.
workLoop() inside Scheduler is how tasks are actually run.
For more details on Scheduler, you can refer to:
3.3 Render
Render is the task scheduled (performConcurrentWorkOnRoot()), it means calculating the new Fiber Tree and figure out
what updates are needed to apply to host DOM.
We don’t need to know details of Fiber Tree here, it is basically an internal tree-like structure that represents current state of our app. It was called Virtual DOM before, but it is not only for DOM now and React team doesn’t call it Virtual DOM any more.
So performConcurrentWorkOnRoot() is created in Trigger phase, prioritized in Scheduler,
and then actually run here. Think of it as if there is a little man, who walks around
the Fiber Tree and checks if they need to re-render and figures out the necessary updates on host DOM.
Because of concurrent mode, “Render” phase might be interrupted and resumed, which makes it a quite complex step.
For more, refer to following episodes:
- How does React traverse Fiber tree internally?
- How does React bailout work in reconciliation?
- How does ‘key’ work internally? List diffing in React
- What are Lanes in React source code?
3.4 Commit
After new Fiber Tree is constructed and the minimum updates are derived, it is time to “commit” the updates to host DOM.
Of course there are more than just manipulating the DOM(commitMutationEffects()).
For example, all kinds of Effects are processed here as well (flushPassiveEffects(), commitLayoutEffects()).
Related episodes:
- How does useLayoutEffect() work internally?
- How does useEffect() work internally in React?
- How does useTransition() work internally in React?
- The lifecycle of effect hooks in React
4. Summary
That’s it for the first episode on React Internals Deep Dive. You can see how much info we can get by simply setting up some debuggers.
Don’t feel intimidated and try to solve one puzzle at a time, you will know React better every day. If you are stuck, ping me on my discord.
Hope this post helps.

Want to know more about how React works internally?
Check out my series - React Internals Deep Dive!